2026 - Microsoft Defender XDR optimizations and configuration
Concrete measures to improve your security with Defender XDR.


Why is this important?
Most security tools we purchase usually come «out of the box» with a configuration that is less than optimal. Still, many organizations simply purchase and install, leaving a huge gap in security and with a lot of untapped potential in their tools. In this article we will take a look at some concrete measures we can take to counteract this.
Introduction to XDR (Extended Detection and Response)
One of the most important points in the operational security strategy of most companies today includes an XDR, such as Microsoft Defender XDR. It is not standardized exactly what makes up an XDR across different vendors, but typically it is an amalgamation of tools such as EDR, CNAPP, SIEM and often a Security Data Lake.
The power of an XDR platform is often misunderstood – many people think that gathering tools in a "single pane of glass" provides good visibility and that it makes work more efficient, but that's often just a small bonus.
The biggest strength of good XDR platforms is that it allows you to collect and correlate data from the entire company across multiple data sources. This helps to move from looking at individual signals to looking at attack paths through the network, analyzing them and shutting them down before it becomes problematic.
«Secure by default»
One of the biggest issues with an XDR and the tools associated with the platform, is that many people misunderstand the job associated with operating them. Install an EDR agent on an endpoint or server, and it should be OK, right? Not really.
Most EDR agents, regardless of vendor, will seek to be as easy to use as possible out of the box. That is, they often tend to fall a bit on the "lazy side" when it comes to configuration, so you end up allowing more than you normally would.
For example, a few years ago, Microsoft changed the default behavior for Linux machines in Azure that are enrolled through Defender for Cloud. While they used to be configured in active mode, they are now set to passive mode by default.
This means that the EDR product is only monitoring and there’s no active response is done at all. This is documented as standard by Microsoft, but often these systems are overlooked and stay in passive mode for a long time.
It is an extremely important point in all of security that you always set settings explicitly. This means that if you want the setting to be 1 and the default is 1, you still must explicitly set the setting to 1.
This is because suppliers often change what is standard, which can affect the system when it is changed if you do not pay attention. An example is the Defender for Cloud example from earlier – where the default changed from EDR being in active mode to being set in passive mode.
Had we been explicit in setting active mode, this would not have been an issue.
The problem does not lie with the vendors – it lies with us, the users who utilize the tools. Most EDR tools make it easy to set configuration that significantly increases security. Most of these settings can be enabled without any end user issues at all. It is, then, up to us to use these opportunities to raise security to match our appetite for risk by taking ownership of our configuration.
Hva kan vi gjøre?
One thing that is absolutely critical to start with is to make sure that Cloud Protection is active if you are using Microsoft Defender for Endpoint (DFE).
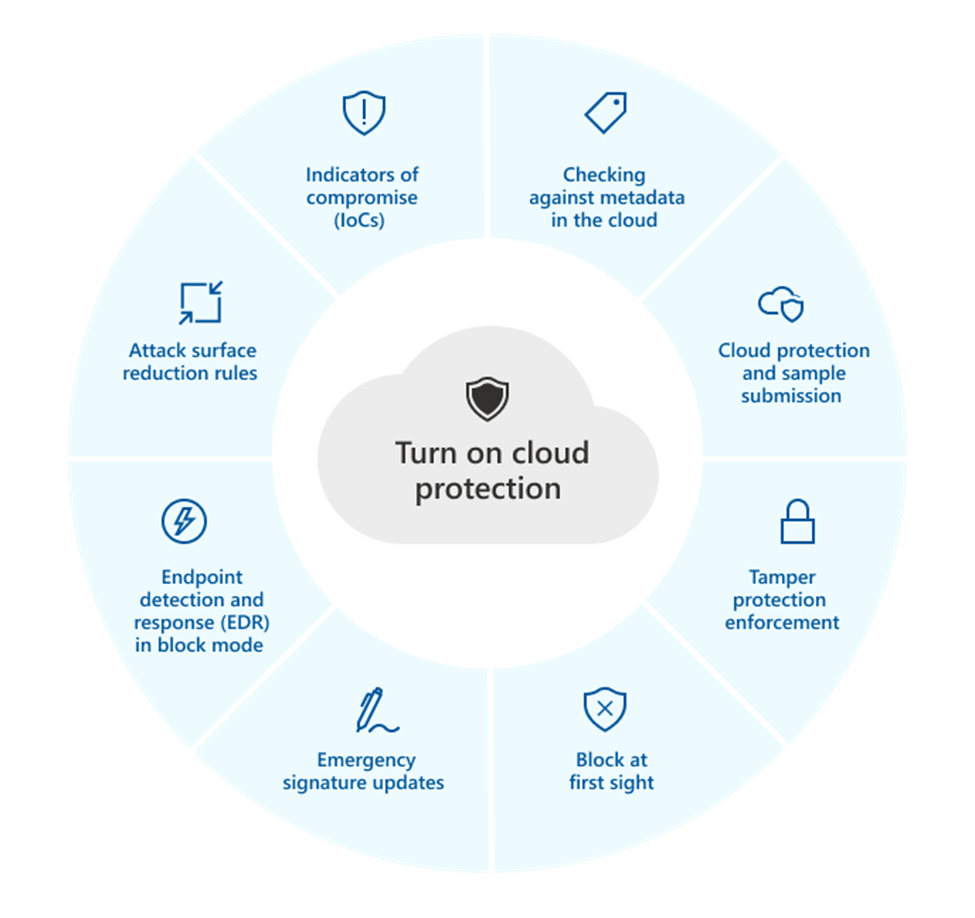
Cloud Protection is on by default, but many people may have turned it off without knowing by turning off cloud sample submission. This must be turned on, either by setting "send all samples automatically" or "send safe samples automatically". For group policy, "MAPS" is equivalent to "cloud-delivered protection" in Intune.
Cloud Protection allows us to use, among other things, "Tamper Protection" which protects us against unwanted changes to our system. "Block at first sight" or "BAFS" is a capability where Microsoft stops all files they have never seen before and does automatic analysis before it is allowed to run. This "BAFS" functionality is one of the most important protections DFE has.
Cloud protection level and cloud block timeout
Once we have made sure that Cloud Protection is turned on, we can also configure the level of protection. The Cloud Protection level is set to "Not configured" by default, which is not desirable.
The options available for the Cloud Protection level are "High", "High Plus" and "Zero Tolerance". Here, we recommend as a minimum to increase to "High". Of the other two options, "High Plus" is relatively similar to "High", but has a few extra measures that can affect the performance of a client. "Zero Tolerance" blocks all unknown files by default and is only recommended for select systems and environments.
Cloud block timeout says something about how long DFE stops suspicious files from running while it makes up its mind about whether there are grounds for suspicion. The default is set to 10 seconds and the maximum is 50 seconds. On most systems, we recommend increasing it to at least 30 seconds, but it is good practice to set to 50 seconds where possible.
Integrate Defender for Cloud Apps
The best tool in the battle against shadow IT is Defender for Cloud Apps (MDA), also previously known as "MCAS." What many people don't know is that an integration with the EDR Defender for Endpoint (MDE) is the main source of discovering new applications for MDA, and it’s not enabled by default. Logs from your endpoints are sent via the integration to Defender for Cloud Apps to provide a deep dive into application usage in your organization.
When you mark applications for blocking or monitoring in MDA, it generally only applies to applications that are visited via a browser and only when you use your company user. When you integrate MDA and MDE together, you will also be able to block applications on the endpoint for all users and thus limit shadow IT on your company's equipment.
Configuration is relatively simple - in the Defender XDR console, go to Settings > Endpoints > General > Advanced features. Here you will find several settings that can be turned on, but specifically it is the "Microsoft Defender for Cloud Apps" and "Custom network indicators" settings that should be set to "On".
In addition, you need to turn on integration with MDE from MDA. Still in the Defender XDR console, go to Settings > Cloud Apps > Cloud Discovery > Microsoft Defender for Endpoint. Here you must set "Enforce App Access" to be enabled. It is also possible to change the severity of alerts here, but it is recommended to do this reactively based on data over time.
Save big on Data Lake
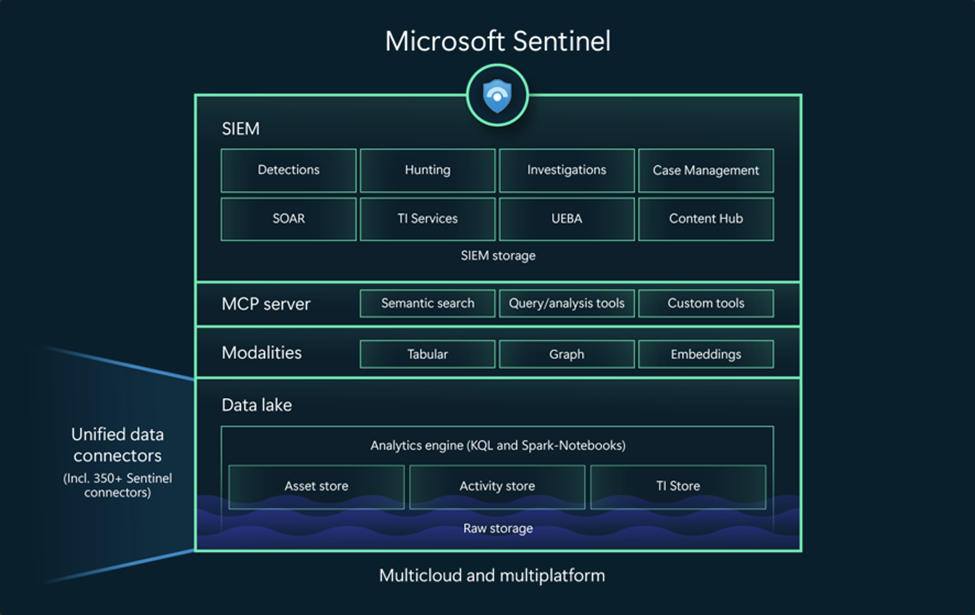
New from 2025 is that the Microsoft Sentinel user interface will move into the Defender XDR console. This applies to all new Microsoft Sentinel customers and will apply to everyone from March 2027.
This brings with it several positive changes – among other things, you can already turn on this integration between Sentinel and Defender, called "Unified Experience". This allows us to do searches across data from Sentinel and the XDR tools at no extra cost. Previously, you had to set up "streaming" of logs from XDR to Sentinel to do this, which cost a significant sum of money.
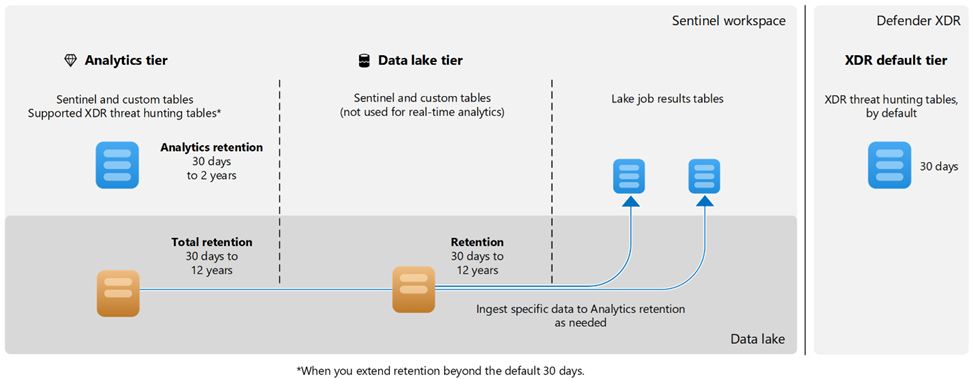
Microsoft has also made the Microsoft Sentinel Data Lake available in most regions. Sentinel Data Lake is a Security Data Lake that is intended to supplement the functionality of Microsoft Sentinel. Where Sentinel is a traditional SIEM platform, designed to receive structured data to be used as a basis for dynamic and rapid detection, the data lake is designed to offer storage of large amounts of data (both structured and unstructured) for longer periods of time at a significantly lower sum.
Microsoft separates between primary and secondary data for security:
-
Primary data is what is typically used for continuous detections and must be able to be available quickly with broad functionality.
-
Secondary data is typically data that has a lower value for detection, is noisy (low cost/benefit value for volume vs detection) or is used for other purposes such as compliance.
Here you can save a lot of money by sending secondary data directly into the data lake.
If you only need a small part of the data submitted to the data lake for primary data purposes, you can use functions such as "KQL jobs" that allow you to extract parts of the data fields in the data lake and turn them into primary data.
The image below illustrates the difference between primary data ("analytics tier", blue color) and secondary data ("data lake tier", orange color), as well as the process of sending specific secondary data up from the data lake as primary data.
AI og MCP
Microsoft Sentinel Data Lake also made a ("Model Context Protocol") MCP endpoint available to Sentinel. This provides the opportunity for analysts to now work together with agents in tools like VSCode to resolve cases.
The agents can run semantic searches, taking into account context, intent, and language understanding against the data in the Data Lake, as well as make use of built-in and self-made (tools). These tools are exposed functions that can be used by agents to perform tasks.
New skills or MCP tools are constantly being released, but as of today, there is support for the following tools:
-
Analyzing tables
-
Downloading data
-
Analyzing entities supported by Sentinel
-
Creating new Security Copilot agents
-
Doing incident management
-
Proactive "threat hunting"
It is recommended to familiarize yourself with how these tools work and how they can assist in the daily security work.
Some examples of applications of MCP tools can be assistance to proactively close down attack paths in the environment, or help to further develop and test detection that you have written or want to write.
Take action – it's your responsibility
Microsoft Defender XDR has an extremely large number of settings across many different tools. This article only mentions a few of the most important ones, but there are many more that need to be followed up both in Defender XDR and the whole of Microsoft 365 and Azure.
If you have an E5 license, you may have many of these capabilities without properly utilizing them. It is important that you do not confuse having licenses or a tool installed for a working capability that it is configured and works – you must take steps to configure your tools to a level that provides the protection you expect.
It is also important not to undermine the settings you implement – new methods for bypassing tools such as EDR are constantly being discovered, but most of these techniques require local administrator privileges on the machine. One of the most important security measures you can still take is to remove local administrator rights and use "just-in-time" services such as "MakeMeAdmin" where needed.
Sicra recommends taking a thorough review of security settings across the Defender XDR portfolio, Microsoft 365, and Entra ID on a regular basis. Using tools like Maester can help automate parts of the job – this ensures that you take advantage of licenses you have, prevent configuration drift, and adopt new capabilities when they are available.
Explore more

AI is cheap now. Here’s how to avoid getting locked in later.

Agentic Security Operations Centers (SOC) are here. But how do you control the agents making the decisions?

11 security measures your business should have in place before the holidays
